TradeWinds GBA
More actions
| TradeWinds | |
|---|---|
 | |
| General | |
| Author | Kevin Bohlmann |
| Type | Simulation |
| Version | 2003 |
| License | Mixed |
| Last Updated | 2003/09/14 |
| Links | |
| Download | |
| Website | |
TradeWinds uses as many random gameplay elements as possible to ensure you a new experience every time you play. The world is created randomly each time you start a new game.
You are free to pursue a career as a merchant, buying and selling the eleven commodities from ports in the three nations, or at the free, or pirate ports.
You can become a pirate yourself, and sell the commodities you have taken from other vessels. Watch out for other pirates, and for the navy of each of the three nations, they will not smile upon your activities, but many are the risks worth taking for fame and glory.
User guide
Sailing
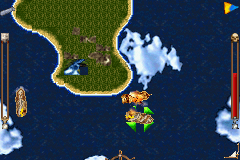
The most important part of TradeWinds is manuevering your boat. Without the ability to bring the boat into range of the enemy you will never pirate anyone. Some sailing experience would be helpful, but is not required. The D-Pad is used to steer your boat, right and left on the D-Pad will turn your till to starboard (right) and port (left).
Watch the clouds to determine the wind direction, and you can always be assured that turning down wind you can easily build up speed. Watch the sails on your boat to determine what direction you are heading in relation to the wind (this is called your "tack").
The icon in the lower right hand corner of the screen resembling a triangular sail on a boom and mast is a guage representing how high you have raised your sails. If the sail in the corner is all the way up, your sails are all the way up. This will affect how fast your boat accelerates, as well as your top speed. There are no "brakes" on the ocean, but the natural drag of the water will slow you down.
Tacks
Heading directly upwind will result in no forward acceleration whatsoever. This is referred to by sailors as being "In Irons". It is possible to head at an angle almost into the wind, this is called "close hauling." You won't go as fast as down wind, and your sails will be tight in along your boat, but you can make progress.
Heading 90 degrees off the wind heading is known as running "abeam". Heading with the wind is known as "Broad Reaching," "Close Reaching," and "Running," depending how closely you face to the actual wind direction. Pay close attention to your sails to determine what your tack is, the more downwind you head, the wider your sails will fly.
This is a good way to keep track of enemy motion as well, predicting where they will move is a sea captain's first defense.
The Wheel
Turning the till right or left affects your heading directly, but sometimes, in battle especially, it is desirable to come about to a new heading much quicker. This is done using the wheel. Bring the wheel up and turn it right or left. Note that you can only come about as far as your speed will let you, this is known as "steerage" by sailors. The steerage is indicated by the orange bars which are on the wheel.
As your speed increases, your steerage increases, and you can turn the boat to a heading which is further away from your current heading. Hit the select button again to drop the wheel, and control the till directly.
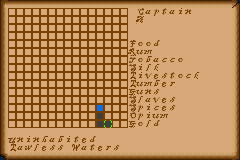
Areas that you have visited will be colored on the map with the color of that nation. Warzones are multicolored (be careful there) and lawless waters are colored black.
You can move the cursor on the map to see the names and types of ports in the areas you have visited. All other areas will say uncharted.
The icon in the upper right hand corner of the screen, the waving flag, shows what nations waters you are currently in. A multicolored flag indicates a warzone, and a black flag indicates lawless waters.
Targeting
To fire upon an enemy boat you must first target it. To target an enemy boat it must be within viewing range (on screen at the time.) Once an enemy boat is targeted it will stay targeted until it is sunk, or out of range. The range to hold onto a target is across several sections of world map, so don't give up if your prey runs off the screen, the green arrow will indicate the direction it has run, chase it down, even to another country.
But beware, you may also find yourself similarly chased by pirates or a navy vessel. When an enemy is targeted, a meter will appear along the right hand side of the screen, this meter indicates the enemy's hull intergrity. Your own meter is on the left.
Combat
The icon in the upper left hand corner of the screen represents the action currently assigned to the shoulder R and L buttons. The cannon represents cannon fire, hitting R will fire the starboard cannons, hitting L will fire the port cannons.
The icon will show the cannon reloading while your crew reload your cannons, then you can fire again. The chain represents a chainshot, used to cripple the opponent's sails. The range is shorter than for a cannon, so get in close before trying this, you have a limited number of these shots at your disposal at any one time.
The flag icon is used to run up a new flag, in case you want to fly a flag of any one particular country. Pay close attention to the flags of the enemy vessels. The colors are: Blue, Yellow and Red are the three nations. Green is an independent merchant, (much like yourself) and Black is a pirate (also much like yourself).
Firing upon a merchant is generally ignored, (except by the merchant, who of course will defend him or herself) but firing upon a navy boat will usually incur wrath and mark you as a pirate for that country.
Becoming an outlaw of a country can make it very difficult to sail in its waters, because you will be constantly harried by its navy, and can only be taken care of by visiting the capital of that country to clear your record (with money, of course). Fire upon pirates, because of course they will fire upon you. Use a chain shot on prey to keep them from running away, or on an assailant to keep them from keeping up as you run away.
Boarding
When an enemy's hull integrity gets below a certain point, their meter will show yellow. This is the time to board them, if you want to take their commodities.
If you continue firing, you will sink them soon enough, and get nothing for your effort and be left with nothing but the damage you will have surely taken. Cycle the action icon to the grapnel, and moving in very close, use the R or L button to board the enemy vessel. Of course, they won't go down without a fight, so when you see the combatants, hit the A and B buttons in rapid succession to melee. To the winner goes the loser's cargo. If it is ever the case that a pirate or naval vessel boards you, hit A and B and you could still come out ahead.
Mooring
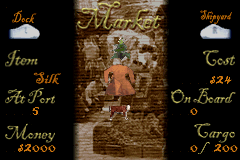
Manuever your boat onto a port to visit the dock, where you can buy and sell commodities and upgrades. These menus are largely self explanatory.
Economy
The eleven commodities will have different prices depending on which nation you visit, and how advanced the port is that you are visiting. Ports range from colony to capital, and warzones and pirate ports are also factors in pricing.
Traveling about is the only way to discover what to buy for what price and where to sell it for max profit. Visit the market of a port to see what is for sale for how much. Press right to buy, left to sell, and up and down to cycle.
Upgrades
Visit the boatwright to see the upgrades available. These will greatly alter the performance of your boat, both sailing and at battle. The sailors affect how closely you can haul to the eye of the wind, and how fast you can come about with minimal steerage.
The gunners affect the range, loading time, and accuracy of your cannons and chain shots. The chainshots are 1 per firing, so stock up if you want to live. The cannons affect the amount of damage you do to the enemy's hull when you fire, the more cannons you have, the more damage you will do. Carpenters slowly repair your ship over time, and warriors affect how your melee battles when boarding will turn out. A lot of warriors can make boarding much easier. The maximum amount of crew you can have on board is smaller than the maximums of each individual crew type. So choose wisely.
Hull repair fixes the damage done to you, at a cost. Mast repair will fix your sails if you have been chained. A large cargo hold increases your cargo capacity for commodities, and hull armor increases your maximum hull integrity. A must for pirating or smuggling.
Piracy and Smuggling
These are the laws of the land. The buying and selling of Opium and Slaves is frowned upon by the three nations. If they catch wind of this they will try to arrest or sink you. But the profitability is worth it.
Attacking a naval boat in that navy's waters will mark you as an outlaw. Attacking a naval boat outside of its waters is generally ignored...
Attacking pirates bothers no one but the pirates. Attacking fellow merchants, while somewhat low, is one of the best ways to turn a profit with the least risk.
Be very careful when sailing into a warzone. There are no laws and everyone that sees you will attack you.
If you happen to become a smuggler or outlaw in a country, find the capital of that country, and be prepared to pay serious money to clear your name. Or just go to one of the other three countries and stay there. Navy boats who have you marked as an outlaw will only chase you where they have jurisdiction.
Saving
The game is saved every time you moor at port. To load, hit the D-Pad down on the title screen to the load selection.
Your character and exploration map and world will be reloaded.
Winning
To win at TradeWinds, you must become rich beyond the dreams of the wildest avaricious Pirate (you must leave port with over 1 million dollars).
Controls
Up/Down - Raise/Lower your sail
Select - Bring the wheel up, Drop the wheel
Left/Right - Turn the till left/right (when the wheel is up)
B - Come about to the new heading (when the wheel is up), Cycle through available targets
Start - Bring up world map, Return to sailing
D-Pad - Cursor (world map)
R/L - See personal stats or cargo (world map)
Comabt:
R/L - Currently assigned actions
A - Cycle through available actions
Boarding:'
R/L - Board the emeny vessel
A/B - Melee attack/defense
Mooring:
Down (at the welcome screen) - Get back underway
Screenshots

Online emulator
| Game Boy Advance | Keyboard |
|---|---|
Credits
- Designed and Programmed by Kevin Bohlmann.
- Art by Jason Pollock.
- Built with the [www.ngine.de HAM] devkit designed by Emanuel Schlessinger.
All artwork in TradeWinds is 100% original by Jason Pollock. Any resemblance to any persons, live or dead, is entirely coincidental.
Special thanks to everyone who posts on the forums at gbadev.org and ngine.de.