Save Sync Vita: Difference between revisions
More actions
No edit summary |
No edit summary |
||
| Line 186: | Line 186: | ||
On Windows, run a terminal on login and keep it open, or use Task Scheduler to launch node dist/index.js at boot with USER_TOKEN and DATA_DIR set as environment variables. | On Windows, run a terminal on login and keep it open, or use Task Scheduler to launch node dist/index.js at boot with USER_TOKEN and DATA_DIR set as environment variables. | ||
== HTTPS == | |||
The Vita requires HTTPS with a valid certificate. Cloudflare Quick Tunnel can be used without an account or domain. | The Vita requires HTTPS with a valid certificate. Cloudflare Quick Tunnel can be used without an account or domain. | ||
| Line 193: | Line 193: | ||
{| class="wikitable" | {| class="wikitable" | ||
! Platform | ! Platform | ||
! Install command | |||
|- | |||
| - | | macOS | ||
| macOS | | <code>brew install cloudflared</code> | ||
| <code>brew install cloudflared</code> | |- | ||
| - | | Linux | ||
| Linux | | <code>curl -L https://pkg.cloudflare.com/install.sh | sudo bash && sudo apt install cloudflared</code> | ||
| <code>curl -L | |- | ||
| - | | Windows | ||
| Windows | | <code>winget install -e --id Cloudflare.cloudflared</code> | ||
| <code>winget install -e --id Cloudflare.cloudflared</code> | |} | ||
| } | |||
While the server is running: | While the server is running: | ||
| Line 212: | Line 211: | ||
</pre> | </pre> | ||
It prints a *.trycloudflare.com address. Use that address as the server URL on the Vita. The tunnel closes when the terminal is closed. For a permanent setup with a domain, Cloudflare Tunnel with a named tunnel can also be used. | It prints a <code>*.trycloudflare.com</code> address. Use that address as the server URL on the Vita. The tunnel closes when the terminal is closed. For a permanent setup with a domain, Cloudflare Tunnel with a named tunnel can also be used. | ||
=== First-time setup on Vita === | === First-time setup on Vita === | ||
| Line 223: | Line 222: | ||
# Fill in Server URL, API Token, and Device Name. | # Fill in Server URL, API Token, and Device Name. | ||
# Select Test Connection. | # Select Test Connection. | ||
# Press Circle to go back, or select Save && Back. | # Press Circle to go back, or select Save && Back. | ||
Test Connection checks both reachability and the token. | Test Connection checks both reachability and the token. | ||
| Line 232: | Line 231: | ||
Download the latest release from GitHub Releases for the platform: | Download the latest release from GitHub Releases for the platform: | ||
* .dmg for macOS | * <code>.dmg</code> for macOS | ||
* .exe for Windows | * <code>.exe</code> for Windows | ||
* .AppImage for Linux | * <code>.AppImage</code> for Linux | ||
* .apk for Android | * <code>.apk</code> for Android | ||
First-time setup: | First-time setup: | ||
| Line 251: | Line 250: | ||
! Platform | ! Platform | ||
! PPSSPP | ! PPSSPP | ||
! RetroArch | |||
|- | |||
| macOS | |||
| <code>~/Documents/PPSSPP/PSP/SAVEDATA</code> | |||
| <code>~/Library/Application Support/RetroArch</code> | |||
|- | |||
| Windows | |||
| <code>%USERPROFILE%\Documents\PPSSPP\PSP\SAVEDATA</code> | |||
| <code>%APPDATA%\RetroArch</code> | |||
|- | |||
| Linux | |||
| <code>~/.config/ppsspp/PSP/SAVEDATA</code> | |||
| <code>~/.config/retroarch</code> | |||
|- | |||
| Android | |||
| <code>/storage/emulated/0/PSP/SAVEDATA</code> | |||
| <code>/storage/emulated/0/RetroArch</code> | |||
|} | |||
These are the most common defaults. PPSSPP varies by install method; if saves are not found, use Browse to point to the correct folder. For RetroArch, the app scans for <code>saves/</code> and <code>states/</code> subdirectories inside the path above. | |||
These are the most common defaults. PPSSPP varies by install method; if saves are not found, use Browse to point to the correct folder. For RetroArch, the app scans for saves/ and states/ subdirectories inside the path above. | |||
=== Workflow === | === Workflow === | ||
| Line 280: | Line 278: | ||
* Restore - downloads from the server and extracts directly into the save folder. | * Restore - downloads from the server and extracts directly into the save folder. | ||
Save IDs on the server use the folder name as the title ID, prefixed with PSP_ or RA_ to avoid collisions with native Vita saves. | Save IDs on the server use the folder name as the title ID, prefixed with <code>PSP_</code> or <code>RA_</code> to avoid collisions with native Vita saves. | ||
Uploading a save to the server on PS Vita: | Uploading a save to the server on PS Vita: | ||
| Line 308: | Line 306: | ||
{| class="wikitable" | {| class="wikitable" | ||
! Badge | ! Badge | ||
! Meaning | |||
|- | |||
| - | | Synced | ||
| Synced | | In sync with server | ||
| In sync with server | |- | ||
| - | | Not Uploaded | ||
| Not Uploaded | | Never uploaded to server | ||
| Never uploaded to server | |- | ||
| - | | Upload | ||
| Upload | | Local is newer | ||
| Local is newer | |- | ||
| - | | Download | ||
| Download | | Server has a newer version | ||
| Server has a newer version | |- | ||
| - | | Cloud Only | ||
| Cloud Only | | On server, not on this Vita | ||
| On server, not on this Vita | |- | ||
| - | | Conflict | ||
| Conflict | | Both sides changed | ||
| Both sides changed | |} | ||
| } | |||
Press X to run Sync All. It uploads everything marked Upload and downloads everything marked Download. Conflicts are reported but not touched. Press Triangle to open Settings. | Press X to run Sync All. It uploads everything marked Upload and downloads everything marked Download. Conflicts are reported but not touched. Press Triangle to open Settings. | ||
== Controls == | == Controls == | ||
{| class="wikitable" | {| class="wikitable" | ||
! Input | ! Input | ||
! Action | |||
|- | |||
| R | |||
| Switch to the Cloud tab on the main screen. | |||
|- | |||
| Triangle | |||
| Open Settings from the Cloud tab. | |||
|- | |||
| Circle | |||
| Go back from first-time setup. | |||
|- | |||
| L | |||
| Go to the Games tab. | |||
|- | |||
| X | |||
| Open the save drawer; run Sync All from the Cloud tab; select Upload to Server; select Download & Restore. | |||
|- | |||
| R | |||
| Switch to the Server Backup tab from the save drawer. | |||
|- | |||
| L | |||
| Open the Local Backup tab from the save drawer. | |||
|} | |||
== Screenshots == | |||
==Screenshots== | |||
https://dlhb.gamebrew.org/vitahomebrews/images/SaveSync-01.png | https://dlhb.gamebrew.org/vitahomebrews/images/SaveSync-01.png | ||
| Line 367: | Line 364: | ||
== Changelog == | == Changelog == | ||
'''v0.1.4''' | '''v0.1.4''' | ||
*Bug fixes | * Bug fixes | ||
**Cloud tab now correctly shows "Synced" after downloading a cloud-only PSP save | ** Cloud tab now correctly shows "Synced" after downloading a cloud-only PSP save. Previously, it was stuck on "Cloud Only" due to backup path mismatch between cloud-only and emulator-detected entries. | ||
*CI | * CI | ||
**Universal macOS binary combining Intel | ** Universal macOS binary combining Intel and Apple Silicon via universal-apple-darwin target. No more separate Intel runner needed. | ||
**Removed retired macOS x86_64 runner | ** Removed retired macOS x86_64 runner, <code>macos-13</code>, which was timing out after 24 hours waiting for a runner. | ||
**Fixed nightly rust-toolchain.toml leaking into Hub build by adding save-sync-hub/rust-toolchain.toml pinned to stable | ** Fixed nightly <code>rust-toolchain.toml</code> leaking into Hub build by adding <code>save-sync-hub/rust-toolchain.toml</code> pinned to stable. | ||
'''v0.1.3''' | '''v0.1.3''' | ||
* | |||
* Fixed PNGQuant for all LiveArea PNGs to fix <code>0x8010113D</code> install error. | |||
* Bumped version. | |||
'''v0.1.2''' | '''v0.1.2''' | ||
* | |||
* Bumped version to 0.1.2. | |||
* Updated splash image. | |||
'''v0.1.1''' | '''v0.1.1''' | ||
* | |||
* Bumped version to 0.1.1. | |||
'''v0.1.0''' | '''v0.1.0''' | ||
* | |||
* Added contents write permission for release creation. | |||
== Credits == | == Credits == | ||
* Forked from | * Forked from [https://github.com/save-cloud Save Cloud Vita] by iamcco. | ||
* Vita app uses [ | * Vita app uses [https://github.com/TheOfficialFloW/VitaShell VitaShell] SQLite VFS and kernel modules, [https://github.com/vita-rust vita-rust], and [https://github.com/vitasdk VitaSDK]. | ||
* Save Sync Hub built with | * Save Sync Hub built with [https://tauri.app Tauri v2] and [https://svelte.dev Svelte 5]. | ||
* Built with the help of AI. | * Built with the help of AI. | ||
== External links == | == External links == | ||
* Reddit - https://old.reddit.com/r/vitahacks/comments/1ucvuqx/release_save_sync_selfhosted_cloud_save_sync_for/ | * Reddit - https://old.reddit.com/r/vitahacks/comments/1ucvuqx/release_save_sync_selfhosted_cloud_save_sync_for/ | ||
* | * GitHub - https://github.com/unveroleone/vita-save-sync | ||
* VitaDB - https://www.rinnegatamante.eu/vitadb/#/info/1418 | * VitaDB - https://www.rinnegatamante.eu/vitadb/#/info/1418 | ||
Revision as of 04:07, 28 June 2026
| Save Sync | |
|---|---|
 | |
| General | |
| Author | unveroleone, iamcco |
| Type | Other Apps |
| Version | 0.1.4 |
| License | GPL-3.0 |
| Last Updated | 2026/06/28 |
| Links | |
| Download | |
| Website | |
| Source | |
Save Sync is a self-hosted cloud save sync project for PS Vita, PPSSPP, and RetroArch across multiple devices.
It uses one server with multiple clients, where all saves go to the same place. The project is forked from Save Cloud Vita, with Baidu Cloud replaced by a self-hosted HTTP API and all strings translated to English.
The PS Vita app backs up native PS Vita saves, PSP/Adrenaline saves, and RetroArch saves. It can upload saves to the user's server as a zip, then download and restore them on another Vita. It also shows per-game sync status on the Cloud tab with one-tap Sync All.
Save Sync Hub is the companion app for desktop and Android. It syncs PPSSPP and RetroArch saves from macOS, Windows, Linux, and Android, using the same server and API token as the Vita app.
The Vita app requires HENkaku and iTLS-Enso. Save Sync Hub is a standard desktop/Android app.
Features
- Self-hosted cloud save sync for PS Vita, PPSSPP, and RetroArch.
- Supports native PS Vita saves, PSP/Adrenaline saves, and RetroArch saves on PS Vita.
- Uploads saves to the server as zip files.
- Downloads and restores saves on another Vita.
- Cloud tab shows per-game sync status.
- One-tap Sync All from the Cloud tab.
- Save Sync Hub syncs PPSSPP and RetroArch saves from macOS, Windows, Linux, and Android.
- Save Sync Hub detects default save locations automatically per platform.
- Save Sync Hub can upload to server, download to local, or restore directly from cloud.
- Uses the same server and API for the Vita app and Save Sync Hub.
- Local Backup tab on Vita can manage save slots on the Vita itself, independently of the server.
- Conflicts are reported but not touched.
Installation
Server setup
The server is a small Node.js app. It stores save files on disk and exposes a REST API. The server needs to be running while syncing, but does not need to be on 24/7.
Docker
Create a docker-compose.yml file:
services:
  vita-save-sync:
    image: ghcr.io/unveroleone/vita-save-sync-server:latest
    container_name: vita-save-sync
    restart: unless-stopped
    ports:
      - "3099:3000"
    environment:
      - USER_TOKEN=${USER_TOKEN:?set a strong token}
      - DATA_DIR=/data
    volumes:
      - vita-save-data:/data

volumes:
  vita-save-data:
    driver: local
Create a .env file:
USER_TOKEN=change-me-to-a-long-random-string
Run:
docker compose up -d
To update later:
docker compose pull && docker compose up -d
If .env is changed, run docker compose up -d instead of docker compose restart, because docker compose restart reuses the cached environment.
The server can be put behind Nginx Proxy Manager or Cloudflare Tunnel for HTTPS. The Vita needs HTTPS with a valid certificate, and iTLS-Enso provides the modern TLS roots.
Node.js directly
Node.js 20 or newer is required. It works on macOS, Windows, and Linux.
git clone https://github.com/unveroleone/vita-save-sync.git
cd vita-save-sync/server
npm install
npm run build
USER_TOKEN=your-secret-token DATA_DIR=./data node dist/index.js
The server listens on port 3000. Add PORT=3099 to the command if a different port is needed.
Raspberry Pi
Start from a fresh Raspberry Pi OS Bookworm or newer. Ethernet is recommended for reliability, but Wi-Fi works too.
Install Node.js LTS:
curl -fsSL https://deb.nodesource.com/setup_lts.x | sudo -E bash -
sudo apt install -y nodejs git
Clone and start:
git clone https://github.com/unveroleone/vita-save-sync.git
cd vita-save-sync/server
npm install
npm run build
USER_TOKEN=your-secret-token DATA_DIR=./data node dist/index.js
To auto-start on boot with systemd, replace pi with the actual username if needed:
sudo tee /etc/systemd/system/vita-save-sync.service << 'EOF'
[Unit]
Description=Save Sync server
After=network-online.target
Wants=network-online.target

[Service]
Type=simple
User=pi
WorkingDirectory=/home/pi/vita-save-sync/server
Environment=USER_TOKEN=your-secret-token
Environment=DATA_DIR=/home/pi/vita-save-sync/server/data
Environment=PORT=3000
ExecStart=/usr/bin/node dist/index.js
Restart=on-failure
RestartSec=10

[Install]
WantedBy=multi-user.target
EOF

sudo systemctl daemon-reload
sudo systemctl enable --now vita-save-sync
Check status:
sudo systemctl status vita-save-sync
Background service on laptop
On macOS, create a launchd plist so the server starts automatically at login. First find the Node.js path:
which node
Save the plist as ~/Library/LaunchAgents/com.vita-save-sync.plist, replacing paths and token:
Label com.vita-save-sync
ProgramArguments /usr/local/bin/node /Users/you/vita-save-sync/server/dist/index.js
EnvironmentVariables USER_TOKEN your-secret-token DATA_DIR /Users/you/vita-save-sync/server/data PORT 3000
WorkingDirectory /Users/you/vita-save-sync/server
RunAtLoad
KeepAlive
Load it:
launchctl bootstrap gui/$(id -u) ~/Library/LaunchAgents/com.vita-save-sync.plist
On Linux, use the systemd unit from the Raspberry Pi setup.
On Windows, run a terminal on login and keep it open, or use Task Scheduler to launch node dist/index.js at boot with USER_TOKEN and DATA_DIR set as environment variables.
HTTPS
The Vita requires HTTPS with a valid certificate. Cloudflare Quick Tunnel can be used without an account or domain.
Install cloudflared:
| Platform | Install command |
|---|---|
| macOS | brew install cloudflared
|
| Linux | sudo bash && sudo apt install cloudflared |
| Windows | winget install -e --id Cloudflare.cloudflared
|
While the server is running:
cloudflared tunnel --url http://localhost:3000
It prints a *.trycloudflare.com address. Use that address as the server URL on the Vita. The tunnel closes when the terminal is closed. For a permanent setup with a domain, Cloudflare Tunnel with a named tunnel can also be used.
First-time setup on Vita
Install the VPK via VitaDB Downloader by searching for Save Sync, or download it from GitHub Releases and install manually via VitaShell.
- Install the VPK.
- Open Save Sync.
- Press R to switch to the Cloud tab.
- Press Triangle to open Settings.
- Fill in Server URL, API Token, and Device Name.
- Select Test Connection.
- Press Circle to go back, or select Save && Back.
Test Connection checks both reachability and the token.
Save Sync Hub setup
Save Sync Hub is the companion app for PC and Android. It syncs PPSSPP and RetroArch saves using the same server and API token as the Vita app.
Download the latest release from GitHub Releases for the platform:
.dmgfor macOS.exefor Windows.AppImagefor Linux.apkfor Android
First-time setup:
- Open Save Sync Hub.
- In the sidebar, enter Server URL, API Token, and Device Name.
- Click Save Config.
- Select the platform: PSP, RetroArch, or Custom path.
- The app auto-fills the default save folder for the OS, or browse to a custom path.
- Click Scan Saves to list save directories.
Default save paths:
| Platform | PPSSPP | RetroArch |
|---|---|---|
| macOS | ~/Documents/PPSSPP/PSP/SAVEDATA
|
~/Library/Application Support/RetroArch
|
| Windows | %USERPROFILE%\Documents\PPSSPP\PSP\SAVEDATA
|
%APPDATA%\RetroArch
|
| Linux | ~/.config/ppsspp/PSP/SAVEDATA
|
~/.config/retroarch
|
| Android | /storage/emulated/0/PSP/SAVEDATA
|
/storage/emulated/0/RetroArch
|
These are the most common defaults. PPSSPP varies by install method; if saves are not found, use Browse to point to the correct folder. For RetroArch, the app scans for saves/ and states/ subdirectories inside the path above.
Workflow
Save Sync Hub workflow:
- Upload - zips the save folder and sends it to the server.
- Download - fetches the latest backup from the server to a local zip.
- Restore - downloads from the server and extracts directly into the save folder.
Save IDs on the server use the folder name as the title ID, prefixed with PSP_ or RA_ to avoid collisions with native Vita saves.
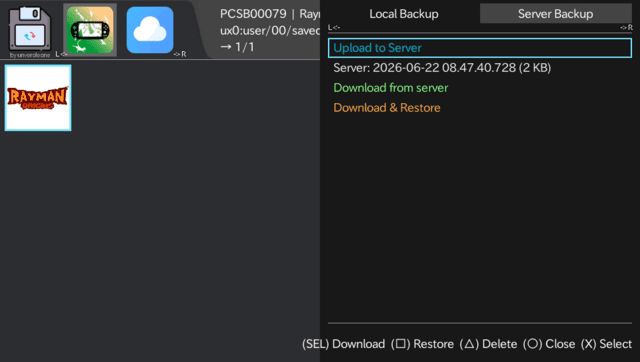
Uploading a save to the server on PS Vita:
- Press L to go to the Games tab.
- Select a game.
- Press X to open the save drawer.
- Press R to switch to the Server Backup tab.
- Select Upload to Server and press X.
The app zips the save, uploads it, and removes the temporary file.
Restoring on another device:
- Set up the other device with the same server URL and token, using a different device name.
- On the Games tab, select the game and press X to open the drawer.
- Press R for the Server Backup tab.
- Select Download & Restore and press X.
The app downloads from the server and restores directly. It creates a safety backup of the current save first. To download without restoring yet, select Download from server instead.
Local backups can be managed from the Local Backup tab by pressing L in the drawer.
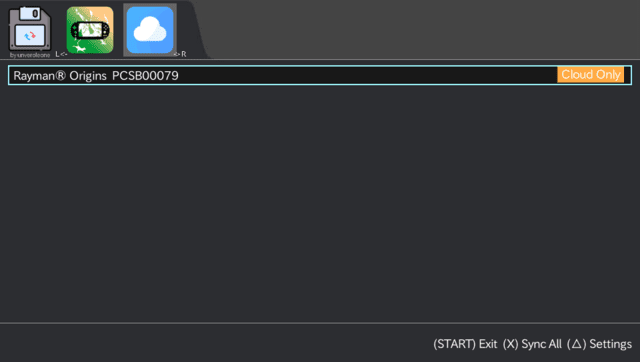
Cloud tab
Press R on the main screen to switch to the Cloud tab.
| Badge | Meaning |
|---|---|
| Synced | In sync with server |
| Not Uploaded | Never uploaded to server |
| Upload | Local is newer |
| Download | Server has a newer version |
| Cloud Only | On server, not on this Vita |
| Conflict | Both sides changed |
Press X to run Sync All. It uploads everything marked Upload and downloads everything marked Download. Conflicts are reported but not touched. Press Triangle to open Settings.
Controls
| Input | Action |
|---|---|
| R | Switch to the Cloud tab on the main screen. |
| Triangle | Open Settings from the Cloud tab. |
| Circle | Go back from first-time setup. |
| L | Go to the Games tab. |
| X | Open the save drawer; run Sync All from the Cloud tab; select Upload to Server; select Download & Restore. |
| R | Switch to the Server Backup tab from the save drawer. |
| L | Open the Local Backup tab from the save drawer. |
Screenshots
Changelog
v0.1.4
- Bug fixes
- Cloud tab now correctly shows "Synced" after downloading a cloud-only PSP save. Previously, it was stuck on "Cloud Only" due to backup path mismatch between cloud-only and emulator-detected entries.
- CI
- Universal macOS binary combining Intel and Apple Silicon via universal-apple-darwin target. No more separate Intel runner needed.
- Removed retired macOS x86_64 runner,
macos-13, which was timing out after 24 hours waiting for a runner. - Fixed nightly
rust-toolchain.tomlleaking into Hub build by addingsave-sync-hub/rust-toolchain.tomlpinned to stable.
v0.1.3
- Fixed PNGQuant for all LiveArea PNGs to fix
0x8010113Dinstall error. - Bumped version.
v0.1.2
- Bumped version to 0.1.2.
- Updated splash image.
v0.1.1
- Bumped version to 0.1.1.
v0.1.0
- Added contents write permission for release creation.