TinyWiiBackupManager: Difference between revisions
From GameBrew
More actions
No edit summary |
No edit summary |
||
| (13 intermediate revisions by 2 users not shown) | |||
| Line 4: | Line 4: | ||
|description=A simple Wii backup manager written in Rust. | |description=A simple Wii backup manager written in Rust. | ||
|author=mq1 | |author=mq1 | ||
|lastupdated= | |lastupdated=2026/01/31 | ||
|type=WBFS Managers | |type=WBFS Managers | ||
|version=0 | |version=5.0.1 | ||
|license=GPL-2.0 | |license=GPL-2.0 | ||
|download=https:// | |download=https://github.com/mq1/TinyWiiBackupManager/releases | ||
|website=https://github.com/mq1/TinyWiiBackupManager | |website=https://github.com/mq1/TinyWiiBackupManager | ||
|source=https://github.com/mq1/TinyWiiBackupManager | |source=https://github.com/mq1/TinyWiiBackupManager | ||
| Line 19: | Line 19: | ||
|image_alt=TinyWiiBackupManager | |image_alt=TinyWiiBackupManager | ||
}} | }} | ||
<!--https://dlhb.gamebrew.org/wiihomebrews/tinywiibackupmanager.7z--> | |||
TinyWiiBackupManager is a simple WBFS manager written in Rust. | TinyWiiBackupManager is a simple WBFS manager written in Rust. | ||
== Setting up the drive== | == Setting up the drive== | ||
'''Warning | '''Warning:''' This will delete ALL data on the device. | ||
=== MacOS=== | === MacOS=== | ||
* Open the Disk Utility app (Applications | * Open the Disk Utility app (Applications > Utilities). | ||
* Use CMD+2 to make sure physical devices are visible | * Use CMD+2 to make sure physical devices are visible. | ||
* Pick the USB drive from the sidebar | * Pick the USB drive from the sidebar. | ||
* From the toolbar select Erase | * From the toolbar select Erase. | ||
* Name the drive a meaningful name (like WII), please make sure the format is "MS-DOS (FAT)" and the scheme is "Master Boot Record" | * Name the drive a meaningful name (like WII), please make sure the format is "MS-DOS (FAT)" and the scheme is "Master Boot Record". | ||
* Click on the "Erase" button | * Click on the "Erase" button. | ||
===Windows=== | ===Windows=== | ||
* Download Rufus from https://rufus.ie/, choose the portable version | * Download Rufus from https://rufus.ie/, choose the portable version. | ||
* On "Device" select your drive | * On "Device" select your drive. | ||
* On "Boot selection" pick "Not bootable" | * On "Boot selection" pick "Not bootable". | ||
* Choose a meaningful name (like WII) and put it into the "Volume label" box | * Choose a meaningful name (like WII) and put it into the "Volume label" box. | ||
* On "File System" pick "FAT32" | * On "File System" pick "FAT32". | ||
* Click on the "START" button | * Click on the "START" button. | ||
===Linux (GNOME)=== | ===Linux (GNOME)=== | ||
* Open the Disks app | * Open the Disks app. | ||
* Click on your drive in the left sidebar | * Click on your drive in the left sidebar. | ||
* Click on the menu (three vertical dots in the top-left of the window) and select "Format Disk" | * Click on the menu (three vertical dots in the top-left of the window) and select "Format Disk". | ||
* Make sure Erase is set to Quick and Partitioning is set to MBR/DOS and click "Format" | * Make sure Erase is set to Quick and Partitioning is set to MBR/DOS and click "Format". | ||
* Under "Volumes" for your device, click on the "+" button | * Under "Volumes" for your device, click on the "+" button. | ||
* Click "Next" | * Click "Next". | ||
* Choose a meaningful name (like WII) and put it into the "Volume Name" box | * Choose a meaningful name (like WII) and put it into the "Volume Name" box. | ||
* On "Type", choose "For use with all systems and devices (FAT) | * On "Type", choose "For use with all systems and devices (FAT). | ||
* Click "Next" and then "Format" | * Click "Next" and then "Format". | ||
===Linux (KDE)=== | ===Linux (KDE)=== | ||
* Open KDE Partition Manager | * Open KDE Partition Manager. | ||
* Click on your device in the left sidebar | * Click on your device in the left sidebar. | ||
* Click on "New Partition Table" | * Click on "New Partition Table". | ||
* Select "MS-Dos" and click on "Create New Partition Table" | * Select "MS-Dos" and click on "Create New Partition Table". | ||
* Click on "unallocated" and then on "New" | * Click on "unallocated" and then on "New". | ||
* On "File System" select fat32 | * On "File System" select fat32. | ||
* Choose a meaningful name (like WII) and put it into the "Label" box | * Choose a meaningful name (like WII) and put it into the "Label" box. | ||
* Click "OK" and then "Apply" | * Click "OK" and then "Apply". | ||
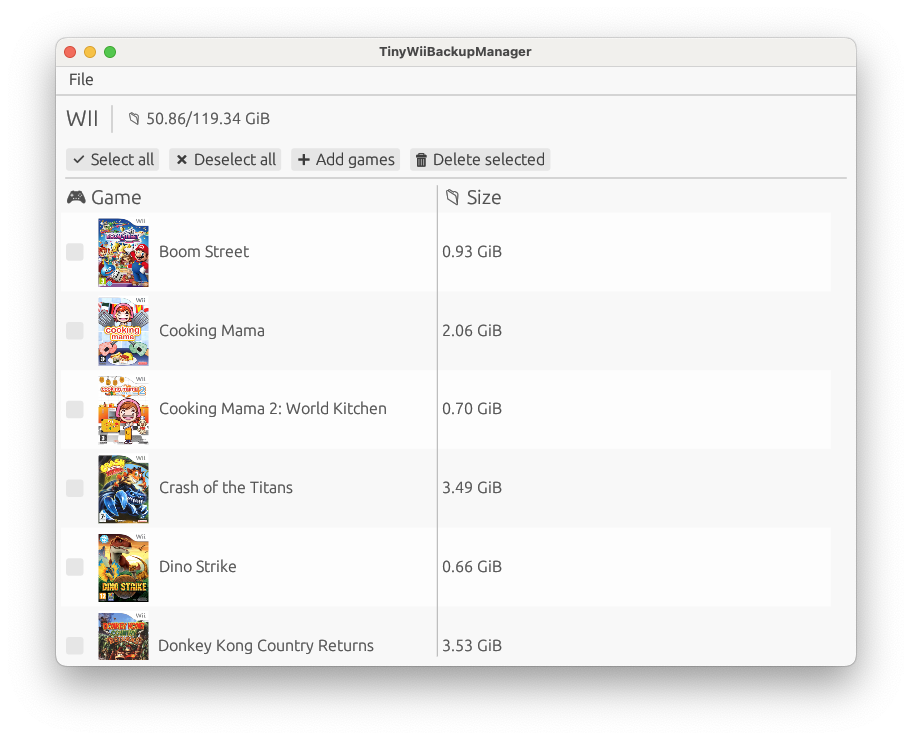
==Screenshots== | ==Screenshots== | ||
https://dlhb.gamebrew.org/wiihomebrews/tinywiibackupmanager2.png | |||
==External Links== | ==External Links== | ||
* | *GitHub - https://github.com/mq1/TinyWiiBackupManager | ||
Latest revision as of 04:17, 1 February 2026
| TinyWiiBackupManager | |
|---|---|
 | |
| General | |
| Author | mq1 |
| Type | WBFS Managers |
| Version | 5.0.1 |
| License | GPL-2.0 |
| Last Updated | 2026/01/31 |
| Links | |
| Download | |
| Website | |
| Source | |
TinyWiiBackupManager is a simple WBFS manager written in Rust.
Setting up the drive
Warning: This will delete ALL data on the device.
MacOS
- Open the Disk Utility app (Applications > Utilities).
- Use CMD+2 to make sure physical devices are visible.
- Pick the USB drive from the sidebar.
- From the toolbar select Erase.
- Name the drive a meaningful name (like WII), please make sure the format is "MS-DOS (FAT)" and the scheme is "Master Boot Record".
- Click on the "Erase" button.
Windows
- Download Rufus from https://rufus.ie/, choose the portable version.
- On "Device" select your drive.
- On "Boot selection" pick "Not bootable".
- Choose a meaningful name (like WII) and put it into the "Volume label" box.
- On "File System" pick "FAT32".
- Click on the "START" button.
Linux (GNOME)
- Open the Disks app.
- Click on your drive in the left sidebar.
- Click on the menu (three vertical dots in the top-left of the window) and select "Format Disk".
- Make sure Erase is set to Quick and Partitioning is set to MBR/DOS and click "Format".
- Under "Volumes" for your device, click on the "+" button.
- Click "Next".
- Choose a meaningful name (like WII) and put it into the "Volume Name" box.
- On "Type", choose "For use with all systems and devices (FAT).
- Click "Next" and then "Format".
Linux (KDE)
- Open KDE Partition Manager.
- Click on your device in the left sidebar.
- Click on "New Partition Table".
- Select "MS-Dos" and click on "Create New Partition Table".
- Click on "unallocated" and then on "New".
- On "File System" select fat32.
- Choose a meaningful name (like WII) and put it into the "Label" box.
- Click "OK" and then "Apply".
Screenshots