Retroarch Bubble Generator Vita
More actions
| Retroarch Bubble Generator | |
|---|---|
 | |
| General | |
| Author | histefanhere |
| Type | Bubble Makers |
| Version | 2021 |
| License | GPL-3.0 |
| Last Updated | 2021/09/04 |
| Links | |
| Download | |
| Website | |
| Source | |
Python script for (semi-automatically) generating custom PS Vita LiveArea Bubbles for your RetroArch ROMS.
Note: No longer updated, please use RetroBuilder, which is a lot simpler to use.
User guide
Prerequisites
The script runs using python3, and only requires Pillow to be installed - check the Installation Documentation or run the following on your command line:
python3 -m pip install --upgrade Pillow
It also goes without saying that you need a PS Vita with homebrew installed, VitaShell is highly recommended for transferring and installing the vpk onto your Vita.
Any roms you have should only be games you own and be obtained via legal means.
There is one more requisite, which is that your ROMS on your PS Vita need to be sorted by system - so in a folder somewhere you should have subfolders for each system you have ROMS for, and in those folders are your ROM files. E.g:
ux0:
└── ROMS/
    ├── GBA/
    │   └── Pokemon - Fire Red.gba
    └── NES/
        ├── Super Mario Bros.nes
        └── Tetris.nes
(Keep this folder structure in mind, because we'll shortly be creating a very similar one for the ROM cover arts.)
Setting Up
1. Images
For each ROM you want to create a custom Livearea Bubble for, you need 3 different cover arts:
icon0.png, the Livearea icon itself.bg.png, the game background once it's openned.startup.png, the clickable image that launches the game.
Since icon0.png is the most important and visible on the Livearea, while bg.png and startup.png are less important and seen less, I've provided some example images in examples/ you can use for your own ROMS.
A note about the size of the images: They will automatically get resized by the script, so the only thing you need to think about is their aspect ratios because they will get stretched a lot if they're not the correct ratio. icon0.png should be a square - for the rest, check examples/.
All your cover art images should be orgainzed in a folder structure which is very similar to the one that stores your ROMS on your Vita - with folders for each system, a subfolder for each ROM and in these folders any cover art images.
If an image isn't found in a games folder it will search its parent system folder, then the parent images folder. This means that you can re-use certain images for multiple custom Liveara Bubbles without repeating the image. E.g:
.
├── Bubble Images/
│   ├── GBA/
│   │   ├── Pokemon - Fire Red/
│   │   │   └── icon0.png
│   │   └── startup.png
│   ├── NES/
│   │   ├── Super Mario Bros/
│   │   │   ├── icon0.png
│   │   │   └── startup.png
│   │   ├── Tetris/
│   │   │   └── icon0.png
│   │   └── startup.png
│   └── bg.png
└── retroarch-bubble-generator/
    ├── settings.yaml
    ├── main.py
    └── ...
Note: The name of the game folder should be the same as the title of the ROM on your Vita. If they are not the same, the script will tell the vpk to open a non-existent ROM file and throw an error.
If we were to create a custom bubble for Tetris (apart of the NES system) then the script would use:
Bubble Images/NES/Tetris/icon0.pngas it's icon.Bubble Images/NES/startup.pngas it's startup image, andBubble Images/bg.pngas it's background image.
On the other hand, if we created a custom bubble for Super Mario Bros it would have it's own unique icon and startup from the Super Mario Bros folder, but it would use the same background as all the other ROMS.
2. Settings
The script needs to be configured with a few more details before it can work correctly and automate a large process of the vpk file creation. An example settings.yaml file is provided in the example/ folder and needs to be copied out of it to be detected. You need to go through each setting and configure it to your needs:
paths.images- The path to the folder (relative to the script) containing all the systems, their games and the images that was described above.paths.vita.cores- This is the path to where all your Retroarch cores are located on the PS Vita - if you're not sure, check the FAQ below for how to find this. Note that "{core}" gets replaced with the system's core you specify by the script.paths.vita.roms- The path to where all your ROMS are on the PS Vita, sorted by system as previously described. "{system}" gets replaced with the chosen system and {filename} with the games filename.systems- Here lay all your systems configuration which includes a name, which core it uses (This gets substituted into *paths.vita.cores) and the format of its ROMS (So if I was creating a bubble forTetrisand the NES's format was{title}.nes, the ROM filename should beTetris.nes).
How to use
Run the script from the command line with the following command:
python3 main.py
The script will automatically detect which systems you've configured in the settings AND which systems there exists a folder for in your images folder, and will let you choose between one of these systems (You can type in either the name of the system or the number next to it).
Once you've chosen a system the script reads all the game subfolders within that system and lets you choose one of these (again, you can either type in the name of the game or the number next to it).
Now comes the hardest part, which is picking a Title ID. Each Livearea Bubble needs a unique title ID containing only uppercase letters and numbers (the script won't let you type in an invalid ID). For your convience, the script also stores all previously entered title ID's and knows if you've doubled up on the same ID. Here is an extract from vita-toolchain on picking a title ID:
"The TITLE id can be anything but it is recommended that you use XXXXYYYYY where XXXX is an author specific identifier and YYYYY is a unique number identifying your homebrew. For example, molecularShell uses MLCL00001."
At this point, believe it or not, you're done. Because the script can piece together the path to the core on your Vita and the path to the ROM on your Vita + other things, All thats left for you to do is review the final parameters that the script will present you with and press enter. At this point the script generates the output .vpk file for you to transfer to your Vita via FTP or USB via VitaShell (or any other prefered method) and install the vpk.
Also provided is an argument-based interface for generating VPK files. For more information do
python3 main.py --help
But the basic usage is as follows:
# python3 main.py "system" "rom"
python3 main.py "GBA" "Pokemon - Fire Red"
Note that you must have at least once already gone through the interactive menu and given the ROM an title ID. Also, the system and rom arguments need to be quoted.
FAQ
Q. How do I choose a core?
Through RetroArch, run your rom as per normal and try out which core works best for you, then find it's corresponding file before configuring this script.
Q. Where do I find the cores?
By default the cores are located in ux0:app/RETROVITA/ and take the form of {core}_libretro.self, but note that ux0:app/RETROVITA is accessable to Retroarch is simply app0.
So by default your paths.vita.cores should be app0:{core}_libretro.self.
Q. A big error comes up when I start the script, something to do with a ParserError in settings.yaml?
This means that the syntax of your settings.yaml file is incorrect. Check that the lines are indented correctly (check the example for reference).
Watch out that a string can't begin with a curly bracket, and the system ROM formats tend to begin with one (e.g. "{title}.nes"), so these need to be wrapped in double quotes.
Q. The script isn't letting me select a system!
The system needs to exist as BOTH a folder in your images path and an entry in the systems data in settings.yaml.
If one doesn't exist, it won't let you select that system.
Q. When I try to launch the bubble on my Vita it throws an error!
Check your core paths, your rom paths, and that your game images folder name in your system folder is the same as your ROM title.
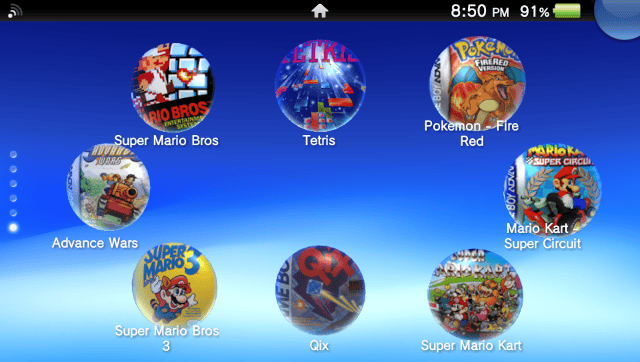
Screenshots
Credits
- u/W00lfwang's original Reddit post detailing the process for generating custom bubbles.
- SayianPrinceVegeta for making a YouTube video documenting the process. This was a big help, and praise the YouTube Algorithm lord for recommending me this in the first place and inspiring me to automate the process.
- The team behind vita-toolchain which is included in this repo and allows for the creating of the VPK files.
- Also included here is pngquant which compresses the images for use on the Vita.
- And credit to many other amazing open source projects which make this all possible in the first place like to Rinnegatamante and to the Retroarch team.