NXSH Switch
More actions
| NXSH | |
|---|---|
 | |
| General | |
| Author | Cesura |
| Type | Utilities |
| Version | 0.1.8-beta |
| License | BSD-3-Clause |
| Last Updated | 2019/02/03 |
| Links | |
| Download | |
| Website | |
| Source | |
BusyBox-like remote shell for the Nintendo Switch over telnet.
Installation
For a basic installation, grab the latest nxsh.nro version from the release page. You can build it from source if you so choose.
To make the application available at the root of your homebrew menu, simply copy the nxsh.nro file to the /switch directory of your SD card. You can do this directly, but it is recommended using one of the many ftpd applications that are available on the Homebrew App Store.
User guide
Connecting
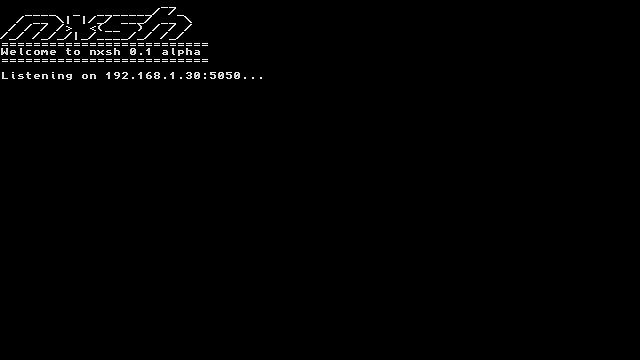
Once started, the application will listen on port 23 for incoming connections. If the socket initializes correctly, the listen address will be displayed on your Switch's screen. Unfortunately, until multithreading is fully supported for Switch homebrew apps, the shell cannot accept more than 1 simultaneous connection.
Linux/BSD/Mac OS
First ensure that you have the "telnet" client installed on your local machine (it may or may not be bundled with your base distribution). For Mac users, it is recommended installing the client via the Homebrew package manager
$ brew install telnet
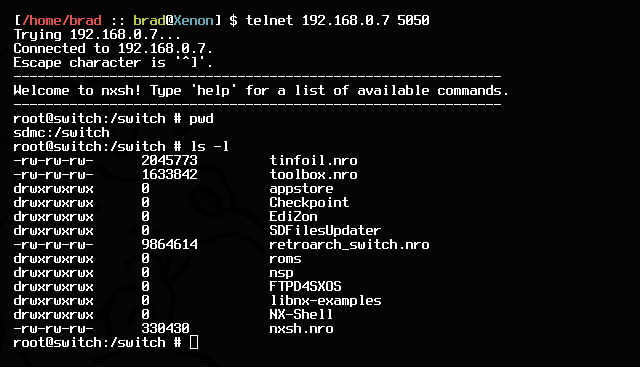
From there, connecting to nxsh is as simple as:
$ telnet [address]
where address is your Switch's IP.
Windows
The built-in Windows telnet client does not play nicely with nxsh, so it is recommended installing PuTTY.
Note that connecting via a "raw" connection instead of a "telnet" one will avoid a pesky "command not found" message upon initialization of the shell. The telnet protocol sends some garbage text as it's negotiating the connection, so if you want a clean-looking shell, ditch that and go for a raw socket.
Usage
nxsh bundles its own implementations of basic coreutils, such as (but not necessarily limited to):
- cat
- ls
- rm
- cp
- mv
etc. etc.
For a full list of commands supported by your current version of nxsh, type "help" in the prompt.
Scripting
As of version 0.1.7 beta, nxsh supports scripting via an ECMAScript-compliant engine named duktape. You can execute scripts in the following way:
$ ./script_name.js
See examples/quadratic.js for an basic example script that works with the shell. As many of the more desirable JS features are non-standard and machine-dependent (such as file I/O).
Screenshots
Switch view
Remote view
Known issues
Changelog
0.1.8-beta 2019/02/03
- Implemented NAND browsing (see mount command). Big thanks to @friedkeenan for the contribution.
0.1.7-beta 2018/11/15
- Added JS scripting functionality via duktape. You can now write scripts and execute them, provided they are ECMAScript 5.1 compliant. See the examples/ *directory for a bit more information.
- Added native print(), readFile(), and writeFile() functions (see above).
0.1.6-alpha 2018/11/06
- Added password authentication system (see passwd command).
0.1.5-alpha 2018/11/05
- Implemented a fetch command with libcurl in the backend. This lets you fetch files from remote servers.
- Added a chmod command that /should/ work, but is disabled while I investigate issues with the Switch's filesystem.
0.1.4-alpha 2018/11/05
- Adding logging functionality (see "log" command).
- Updated prompt to be more traditionally unix-like (thanks for the suggestion @fennectech).
0.1.3-alpha 2018/11/03
- Sorry for so many quick releases. This one fixes a critical segfault and updates some of the usage documentation.
0.1.2-alpha 2018/11/02
- Added cp/mv functionality, and fixed a bug for PuTTY users. Note that it is recommended that you connect with the "raw" option rather than "telnet" in PuTTY.
0.1-alpha 2018/11/02
- First relesae.