Hatari Wii By Wiimpathy
More actions
| Hatari Wii | |
|---|---|
 | |
| General | |
| Author | Wiimpathy |
| Type | Computer |
| Version | 0.5 |
| License | GPL-2.0 |
| Last Updated | 2016/08/03 |
| Links | |
| Download | |
| Website | |
| Source | |
Hatari is an Atari ST(E), TT and falcon emulator. The Atari ST was a 16/32 bits home computer.
This port is based on Hatari 1.9.0.
Features
- A virtual keyboard to send Atari ST keys to software.
- A mapper to bind ST keys to Wii controllers.
- Mouse emulation with Wiimote pointer, classic and GameCube controller stick/d-pad.
- 10 memory snapshots per game.
- A simple image viewer.
Installation
Note: Hatari Wii is shipped with Emutos, a free TOS. Use a real TOS for better compatibility.
Hatari can be launched directly with the Homebrew channel, or any other homebrew launcher. It also can be used as a plugin, and launched with command arguments through WiiFlow or Postloader (see Wiiflow plugin section). The emulator and folders can be copied on SD card, or USB drive.
When the emulator starts, it looks for a configuration file (hatari.cfg) and a TOS file in the current directory. Here is the default directory structure:
- /apps/hatari - The default executable (boot.dol), configuration file (hatari.cfg) and TOS (tos.img) directory.
- /hatari/fd - The floppy disk directory. Copy the games and softwares images here. The supported floppy images formats are : .st, .stx, .msa, or .dim.
- /hatari/saves - The memory snapshots are saved in this directory.
- /hatari/hd - Hard disk directory.
- /hatari/doc - Document directory. Manuals in image format can be stored here. The image viewer can read .png, .jpg or .bmp files.
About TOS:
- The tos file is the operated system. By default, it should be named tos.img, and placed in /apps/hatari.
- The included Tos is a free version, and is called the Emutos.
- For better compatibility, use original TOS 1.02 or 1.04 for ST games, and TOS 1.62 or 2.06 for STE games.
- Tos 3.0x are for TT, and 4.0x are for falcon (untested in the Wii version).
User guide
A manual located in the Doc folder can be read directly in the emulator. It's an image version of the Manual_HatariWii.pdf.
Load a game
To launch a game, choose Floppy A, select the game in the file browser, validate with OK, and press Reset. To speed up the loading time, enable Turbo mode in the main menu. Don't forget to disable this option once in the game.
If the game can't start or crashes, try different options. First, try another TOS file. Ram size is important too, some games must be started with a specific size.
If there is a white screen for a very long time and then the GEM desktop, it could mean that no floppy has been inserted.
At last, if there are issues like controls not responding, or other bugs, try another version, it may be a bad dump/crack. The .stx format is generally better because it's closer to the original disk.
Wiiflow plugin
All command lines arguments can be sent to Hatari, by changing the "arguments=..." line in /WiiFlow/plugins/hatari.ini file. See the original Hatari manual for the available options.
There are several ways to launch the games. The simplest way (and default) is to launch the game directly without option only by sending game's path. With this method all the games share the same hatari.cfg.
However, some games require a different TOS, or Ram size. Here are two alternate methods.
Configuration files:
- Create one configuration file (.cfg) per game, containing the path, and launch the .cfg instead.
- Create a folder in /hatari called "cfg" for example and copy your .cfg here.
- This way, we can specify all the settings like TOS etc.
- A PC application called "createcfg" is provided to automate this task. See the associated README_WiiFlowCfg.txt for the basic usage.
Save files:
- Create one save file (.sav) per game once the settings are applied (Tos, Ram, etc.).
- Modify /WiiFlow/plugins/hatari.ini to change the files WiiFlow is scanning: "filetypes=.sav".
- Change the directory too: "romdir=hatari/saves". Reload Wiiflow cache for the changes to take effect.
Note: The Wiiflow plugin has been essentially tested with an SD card and USB drive setup. For USB only, the default paths may require some tweakings in hatari.cfg.
Menus options
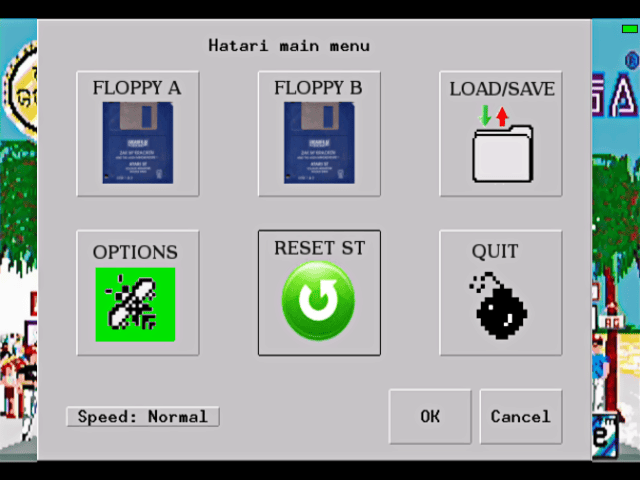
Main menu:
- Floppy A - Insert a floppy disk in drive A.
- Floppy B - Insert a floppy disk in drive B.
- Load/Save - Load or save a memory snapshot. There are 10 available slots.
- Options - Open Hatari settings menu.
- Reset ST - Reset the Atari ST. Each time you insert a new disk, you have to press Reset to start the game.
- Quit - Quit the emulator.
- Speed - Toggle emulator’s speed. To speed up loading times, choose Turbo mode.
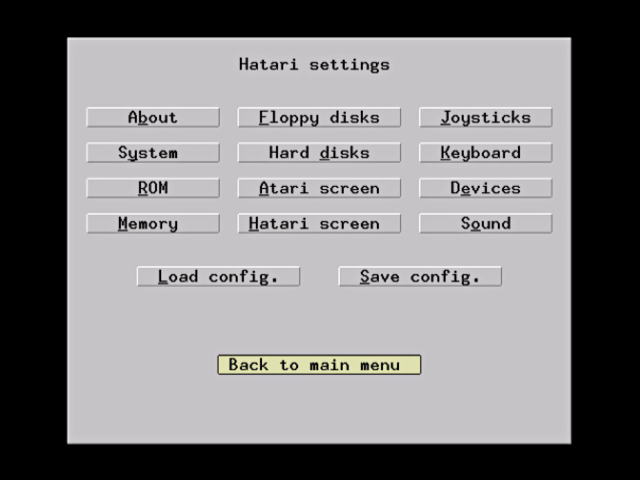
Settings menu:
- About - Display the credits window.
- System - Choose machine type and adjust different CPU settings.
- ROM - Select the TOS and cartridge image here.
- Memory - Select ST RAM size.
- Floppy disks - Default floppy directory and other floppy settings.
- Hard disks - Select hard disk images.
- Atari screen - Choose monitor type and display borders. Some softwares have extra information in the borders. Offset allows to adjust the vertical offset if borders enabled.
- Hatari screen - Emulator screen settings. Display the statusbar and change the framerate.
- Joysticks - Choose ST joystick type, and the corresponding Wii controller. Most options are available in the mapper, or automatically handled. By default, ST Joystick 1 is the mouse/joystick 1.
- Keyboard - Load a keyboard mapping file for another layout (azerty for example). Used for an usb keyboard.
- Devices - Printer, modem and midi settings.
- Sound - Audio frequency, and other sound settings. The Wii requires 32000Hz.
- Load config./Save config. - Load or save the configuration file. By default, it looks for hatari.cfg.
Virtual keyboard
By default, the keys on top of the keyboard with numbers will be sent as the symbols ( !, *, £, etc.). To send numbers, press the keypad on the right. You can browse the keys with the dpad/stick or with the Wiimote pointer.
- Long press - Check this box to send a long keypress. It can be useful if the key is not sent correctly in some games.
- Joy mode - Toggle between ST Joystick and ST mouse mode. In joystick mode, the Wiimote is the default controller. You can choose another controller in the mapper("Bind key"). In mouse mode, the Wiimote pointer acts like the ST mouse. The classic and Gamecube controller can emulate mouse movements with the stick and d-pad too.
- Bind key - Check this box to assign the selected key to a Wii button. It will open the Wii mapper.
- Close - Close the virtual keyboard.
Wii mapper
The Wii mapper allows to bind Atari ST keys to Wii controllers. You open it when "Bind key" is selected in the Virtual keyboard.
Click on the controller icon to select the controller. In "Joy mode", you need to choose the desired controller here for the d-pad to be active.
When mapping ST key to the Wiimote d-pad, the binding is for a Wiimote held vertically (contrary to what the icon suggests).
You can clear a binding by choosing the configured button, and pressing on Wiimote and Classic Controller, or on the GameCube controller.
- Arrows on D-pad - Check this box to enable ST arrow keys on the D-pad. When enabled, the ST joystick directions are ignored.
- Reset keys - Restore the default key mapping.
- Close - Close the Wii mapper.
Image viewer
A simple image viewer can be used to read documents, manuals or game's codes for example.
It can be accessed via the filebrowser. Open the main menu, press Floppy A, select the image by pushing A button. You can move the image with the d-pad or / , / to browse per page. Push button to go back.
The images are best viewed with a width of 640. To convert a PDF to images for example, you can use a PC software like ImageMagick. You would convert a PDF to a single JPG like this: convert -density 100 mydocument.pdf -append myimage.jpg
Notes
The keypad numbers on the virtual keyboard don't correspond to the real ST scancodes. In fact, the scancodes are those of the numbers on top of the ST keyboard.
Very few games need the keypad. One of these games is Welltris. A workaround to bind the keypad to Wii pads is to edit the .cfg manually by adding the scancodes.
Here is an example: in [Joystick0] section, modify nKeytoJoyWii1Left = 104 for key '4' on d-pad Left and nKeytoJoyWii1Right = 108 for key '6' on d-pad Right.
You can find the scancodes here. The codes have to be converted from hexa to decimal.
Controls
Wiimote Horizontal & Nunchuck
Menu:
D-Pad - Next/Previous menu, PageDown/Up (File selector)
Nunchuck Control Stick - Navigate the menu
Pointer - Move mouse cursor
A/2 - Confirm
B - Cancel/Close
Minus - Go to the first item, PageUp (Image viewer), Clear binding (in the mapper dialog)
Plus - Go to the last item, PageDown (Image viewer)
In game:
D-Pad - Joystick direction + Mouse
Nunchuck Control Stick - Joystick direction only
Pointer - Mouse
A - ST Fire button, Left mouse button
B/1 - ST Space, Right mouse button
Plus - Open virtual keyboard
Minus/2 - To be configured in mapper
Home - Enter menu
Classic Controller
Menu:
D-Pad - Next/Previous menu, PageDown/Up (File selector)
Control Stick - Navigate the menu
A - Confirm
B - Cancel/Close
L/R - Go to the first/last item, PageUp/PageDown (Image viewer)
Minus - Clear binding (in the mapper dialog)
In game:
D-Pad - Joystick direction + Mouse
Control Stick - Joystick direction only
A - ST Fire button, Left mouse button
B - ST Space, Right mouse button
Plus - Open virtual keyboard
L/R/Minus - To be configured in mapper
Home - Enter menu
GameCube Controller
Menu:
D-Pad - Next/Previous menu, PageDown/Up (File selector)
Control Stick - Navigate the menu
A - Confirm
B - Cancel/Close
L/R - Go to the firstlastitem, PageUp/PageDown (Image viewer)
RZ - Clear binding (in the mapper dialog)
In game:
D-Pad - Joystick direction + Mouse
Control Stick - Joystick direction only
A - ST Fire button /Left mouse button
B - ST Space, Right mouse button
Z - Enter graphic virtual keyboard
L/R - To be configured in mapper
Start - Enter menu
Screenshots
Media
Hatari Wii v0.0.4 (Cid2Mizard)
Changelog
v0.5
- ST mouse can be emulated with Wii controllers sticks or d-pads.
- A better and nicer virtual keyboard.
- The mapper is improved. It's also possible to configure the d-pads.
- A new savegame system. 10 available slots with previews.
- A simple image viewer.
- A lot of cleanups and other improvements.
Credits
- Hatari developpers: Nicolas Pomarede, Thomas Huth, Eero Tamminen and Laurent .
- Sallafranque.
- Wii port: yohanes (first port), wiimpathy.
- DevkitPro/libogc and SDL-Wii team.
- L.
External links
- WiiBrew - https://wiibrew.org/wiki/Hatari_Wii
- GitHub - https://github.com/Wiimpathy/HatariWii