CustomizeMii Wii
More actions
| CustomizeMii | |
|---|---|
 | |
| General | |
| Author | Leathl, WiiDatabase Team |
| Type | PC utilities |
| Version | 3.11.1 Mod |
| License | Mixed |
| Last Updated | 2015/12/14 |
| Links | |
| Download | |
| Website | |
| Source | |
CustomizeMii is a custom channel creator for the Wii developed by Leathl.
Note: Editing WAD files can result in a brick of your Wii. Only use this application if you have a bricksafe Wii, meaning either Preloader or BootMii/boot2 is installed, and if you know what you're doing. This application comes without any express or implied warranty. The author can't be held responsible for any damages arising from the use of it.
User guide
The basics
These are some basic instructions for CustomizeMii. Before you begin: please do not install any WADs without a proper brick protection.
If you want to create your own custom channels, first it is important to understand how the creation of a custom channel with CustomizeMii works. Skip this if you already know.
Basically, you can't create a channel from scratch (in fact, you could, just not with this application).
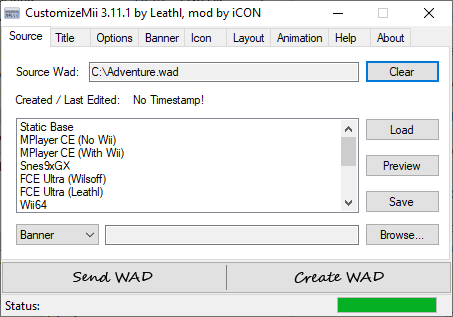
You need a base WAD which you can modify. You can either download one within this application or use any WAD (must be a channel of course) from anywhere. You can then edit the WAD file.
The editing of animations is for advanced users, so if you're not familiar with brlyt's and brlan's, get a static base WAD or one with the animation you want.
So, let's start to create a channel. Download a base WAD through the application or load one from your HDD. You can preview the downloadable WADs through the preview button. All options below are optional.
Mixing banner, icon and sound
The options below the downloadable base WADs are the "replace" options.
Let's say you have loaded WAD A as a base, but you want the icon of WAD B and you have a 00000000.app that contains a sound that you want to use.
No problem! Just use the dropdownbox which yet says "Banner" and choose "Icon". Click on the browse button next to it and choose WAD B. The icon of WAD B will replace the icon of WAD A.
After that, choose "Sound" from the dropdownbox and browse for the 00000000.app, the sound.bin will be extracted and used instead of the one within WAD A.
Note: These features are non-destructive, i.e. you can always use the clear button to get back to the banner/icon/sound of WAD A!
Channel information
You may want to change the channel information, i.e. the title and ID. Let's change the channel title first. It's the text that will be displayed when you hold your cursor over the channel. Goto the "Title" tab and enter a title for all languages.
If you want to change the title for a specific language, just use the language's textbox. If you want a different title for every language, you don't need to fill in a title for all languages.
You may also use the translate "Channel" button. Enter the English name in the all languages textbox (e.g. "MPlayer Channel"). Click translate and it will be automatically translated to each language.
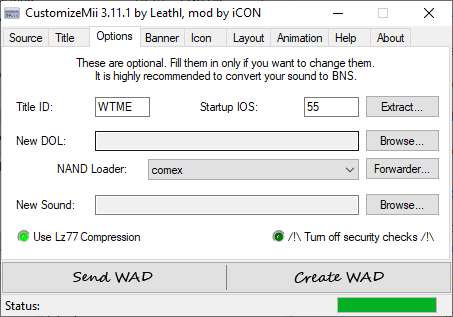
Now, the title ID. Open the "Options" tab and you'll see a textbox for the ID. The ID is 4 characters long and only contains letters and numerics. Lower case letters will automatically converted to upper case.
Change it to a unique(!) ID, because channels will overwrite existing channels with the same ID.
It is recommended not to use any title ID beginning with the following characters, because official channels use these and thus your channel may overwrite them: C, E, F, H, J, L, M, N, P, Q, W.
Inserting a new DOL
Let's bring some life into the channel. In the "Options" tab, use the browse button for a new DOL.
Either load a forwarder, the DOL of any application or a WAD to use it's DOL. Note that some applications require more than just a DOL and thus may not work in a channel (e.g. MPlayer CE).
Choose a NAND loader or just stick with the one selected (both will do fine).
You can also use the built-in forwarder creation by using the forwarder button right below the browse button for DOLs.
You need the ForwardMii.dll in order to use the forwarder creation.
Inserting a new sound
For the sound, you can either use a wave or mp3 (needs lame.exe) file or the sound replace function to use the sound of an existing sound.bin/00000000.app/WAD.
If you want looped sound, open your wave file with wavosaur and add loop points before.
To save space, you can convert your wav or mp3 files to BNS. You can take the loop from a prelooped wave file or enter the loop start point manually. Wave files must be 16bit PCM.
It is possible to directly convert stereo Wave files to mono BNS files, note that only the left channel of the Wave will be taken.
Editing the banner/icon
Note: If you're an advanced user and want to edit the brlyt/brlan, do that first.
Let's begin with the real customization. This guide only describes the steps for the banner, but the instructions are the same for the icon.
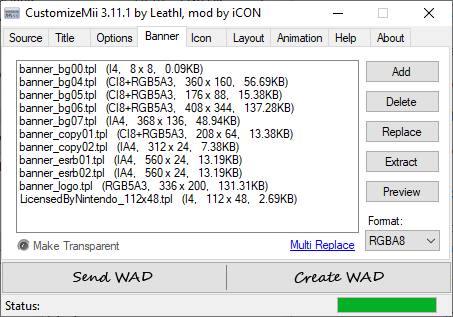
Goto the "Banner" tab. You shouldn't touch the add and remove buttons, they're for advanced users that change the animation. (However, they can't really harm your channel, as CustomizeMii will check for missing and unneeded TPLs while creating a WAD).
You will see a list with all TPLs inside the banner.bin. When you select a TPL, it's current format will be shown in the "Format" dropdownbox. Note that CustomizeMii can read 8 different TPL formats, but only write 3 (RGBA8, RGB565 and RGB5A3), that should be enough for your needs.
You can use the preview button to preview a TPL, but you get one more important info, the image size. It will be shown in the title of the preview window. If your images aren't the same size, they will be resized! So be sure to have at least the correct aspect ratio, so your images wont be squeezed or whatever.
Before replacing the image, choose a format from the dropdownbox. (RGBA8 = High Quality, Big Size --- RGB565 = Moderate Quality, Small Size --- RGB5A3 = Bad Quality, Small Size).
Now you can use the replace button to insert your image. Preview the TPL after replacing to check the image. Maybe you want to use another format though? No problem, just replace the TPL again.
(You can use the "Make Transparent" checkbox to make a TPL transparent, e.g. if you don't like one piece of an animation. It's non-destructive, i.e. you can always uncheck the box).
Editing the animation
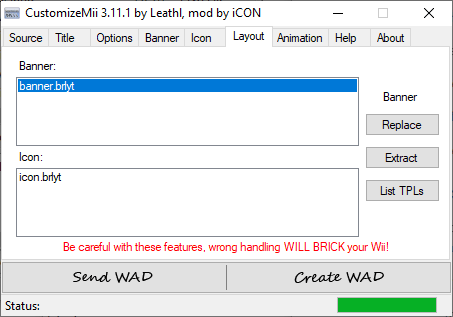
Note: Advanced users only. Skip this part, if you don't really know what brlyt and brlan files are and how they're structured.
Goto the "Layout" tab. You will see the banner.brlyt and icon.brlyt there.
Above the buttons is a text that will indicate whether you're doing actions on the "Banner" or the "Icon" (When you select the banner.brlyt, you're editing the "Banner" and vice versa).
Now, just replace the banner.brlyt and icon.brlyt files as you want. You can use the list TPLs button afterwards to see all TPLs that are required by the banner.brlyt/icon.brlyt (Don't worry, CustomizeMii won't let you create a WAD, if you forgot a required TPL).
Now, goto the "Animation" tab. It's similar to the "Layout" tab. You shouldn't touch the add or delete button unless your base WAD only has a banner.brlan and you want to use a banner_Start.brlan and banner_Loop.brlan.
In this case, first add the two files and then delete the old banner.brlan.
Else just replace the files with yours. Be absolutely sure the your brlan files only refer to panes that are indicated in your brlyt files.
That's it, here's nothing left to do.
Creating the WAD/Send it to the Wii
Your channel should be ready to be created.
Just click on the create WAD button. CustomizeMii will do some failure checks and if all went fine, a save dialog will pop up. If you get an error or warning, read the message carefully. It should give you enough information to fix the problem yourself.
You can also send the Channel directly to the Wii. For it to work, the Channel must be less than 4 MB of space.
Make sure the Homebrew Channel is running and connected. Click the send WAD button. Choose a protocol and enter your Wii's IP and the IOS to use for installation. Click on transmit to start the creation and transmission process. After the channel was sent, you will be asked if you want to save the Channel.
Screenshots
Media
How to use CustomizeMii (HomebrewHelp)
Changelog
Version 3.11.1 Mod (by WiiDatabase.de)
- All files are now on GitHub.
Version 3.11 (by Leathl)
- Updated libWiiSharp to 0.21.
- => Fixed detection of loops in wave files.
Version 3.1
- Updated libWiiSharp to 0.2.
- => Speed up in TPL conversion.
- => Fixed IA8 TPL code (from/to).
- => Fixed CI14X2 TPL code (from).
- => Added conversion to CI4 / CI8.
- => Added BNS to Wave conversion (Extract -> Sound -> As Audiofile).
- Added option to make the sound silent.
Version 3.0
- Switched backend to libWiiSharp (http://libwiisharp.googlecode.com).
- Speed improvements through using RAM instead of temp files on HDD.
- No separate Mono version anymore, the normal version works with Mono (even compiling forwarders!).
- Fixed complex forwarder loading screen to be fullscreen (thanks wilsoff / tantric).
- Fixed bug where startup IOS was set to 0 when sending channel to Wii.
- Doesn't require common-key.bin anymore.
- Added checkerboard for transparent areas in images (preview window).
- Added ability to change a TPLs format (preview window).
- Added ability to rename and resize TPLs (right click on listbox).
Version 2.31
- Fixed sending to Wii.
Version 2.3
- Fixed bug when extracting icon images.
- Added ability to change the startup IOS (IOS used to launch the title).
- Added support for Korean channel title (reading and writing).
- Added TPL width and height to Banner and Icon list.
- Added ability to replace multiple TPLs at once (images must have the same filename).
Version 2.2
- Fixed some bugs with the preview window.
- Fixed Complex Forwarder in combination with Waninkoko's NAND Loader.
- Fixed saving of base WADs.
- Fixed saving of WAD after sending it to the Wii.
- Fixed CMP TPL code (thanks pbsds).
- Added conversion to IA8 (thanks pbsds), IA4, I8 and I4.
- Fixed conversion from IA8 and I4.
- Fixed some general TPL bugs (format detection, ...).
- Added additional paths to the Complex Forwarder (max. 16).
Version 2.1
- Added CustomizeMii Installer (by WiiCrazy / I.R.on).
- Fixed rough edges (artifacts) on images (will be fixed automatically).
- Replaced the TPL preview window with the one from ShowMiiWads for easier handling.
- Added loop prelistening to the BNS conversion window (only for wave files).
- Added drag & drop ability cause the file dialogs kept bothering me.
- Improvement in startup speed (thanks shadow1643).
- Added creation/last edited time (only for CustomizeMii 2.1+ channels).
- Added a button to translate the word "Channel" to every language.
- Improved detection of required TPLs.
- Little improvements and fixes.
- Changed the complex forwarder to be more configurable (choose any path you want).
- ForwardMii is now bundled with CustomizeMii.
Version 2.01
- Base WAD downloading works again.
Version 2.0
- Added BNS conversion (Mono and Stereo, with and without loop).
- Fixed MP3 conversion (some files didn't convert).
- Lz77 checkbox is now ticked by default.
- Removed Lz77 compression of sound.bin as most sounds will get bigger.
- Added ability to insert DOLs from any channel WAD.
- Added ability to re-add the interal DOL (To switch the NAND Loader).
- Added ability to extract the contents, DOL, sound and all images.
- Added displaying of approx. blocks to the success-message.
- Deleted some functions of the complex forwarder as they weren't working properly.
- Some bugfixes and improvements.
Version 1.2
- Fixed writing/reading of channel titles, so japanese characters will work now.
- Added checkbox (Options tab) to turn security checks off.
- Added built-in forwarder creator (Needs the ForwardMii.dll which is separately avaiable).
- You can choose MP3 files as channel sound (Needs lame.exe in application directory).
- Bugfixes.
Version 1.1
- Note: License upgraded to GNU GPL v3.
- Sound is working now.
- Added brlan and brlyt tabs (for advanced users).
- Added displaying of image width and height in preview window.
- Added "Make Transparent" checkbox for TPLs.
- Fixed IA8 previewing / extracting.
- Improved bricksafety (hopefully).
- Added Tooltips.
- Added update check at startup.
- Wrote basic instructions (see Instructions.txt or instructions tab).
Version 1.0
- Initial Release.
External links
- Google Code - https://code.google.com/archive/p/customizemii
- WiiBrew - https://wiibrew.org/wiki/CustomizeMii
- GitHub - https://github.com/Brawl345/customizemii/releases
- WiiDatabase - https://wiidatabase.de/downloads/pc-tools/customizemii/