HVCA GBA: Difference between revisions
More actions
Created page with "{{#seo: |title= (Console) - GameBrew |title_mode=append |image=hvca2.png |image_alt=HVCA }} {{Infobox GBA Homebrews |title=HVCA |image=hvca2.png |description=A NES emulator fo..." |
No edit summary |
||
| (23 intermediate revisions by the same user not shown) | |||
| Line 1: | Line 1: | ||
{{Infobox GBA Homebrews | {{Infobox GBA Homebrews | ||
|title=HVCA | |title=HVCA | ||
|image= | |image=hvca02.png | ||
|description=A NES emulator for the Game Boy Advance. | |description=A NES emulator for the Game Boy Advance. | ||
|author=outside-agb | |author=outside-agb | ||
| Line 14: | Line 8: | ||
|version=1.40 | |version=1.40 | ||
|license=Mixed | |license=Mixed | ||
|download=https://dlhb.gamebrew.org/gbahomebrews/ | |download=https://dlhb.gamebrew.org/gbahomebrews/hvcagba.7z?k33p0fil35 | ||
|website=http://mc68882.s53.xrea.com | |website=http://mc68882.s53.xrea.com | ||
|source= | |source=https://dlhb.gamebrew.org/gbahomebrews/hvcagba.7z | ||
}} | }} | ||
HVCA, or Home Video Computer Advance, is a NES emulator for the Game Boy Advance (formerly known as Unofficial Famicom Advance/UFCA) | {{#seo: | ||
|title= (Console) - GameBrew | |||
|title_mode=append | |||
|image=hvca2.png | |||
|image_alt=HVCA | |||
}} | |||
HVCA, or Home Video Computer Advance, is a NES emulator for the Game Boy Advance (formerly known as Unofficial Famicom Advance/UFCA). | |||
Based on | Based on [[Famicom Advance GBA|Famicom Advance]], various functions such as support for new mappers have been greatly expanded. It supports sound, custom palette, real-time save, rapid-fire key, FDS emulation, NSF player, [[PogoShell GBA|PogoShell]] plugin. | ||
Support Mapper: 0, 1, 2, 3, 4, 7, (9), (10), 16, 18, 19, 21, 22, 23, 24, 25, 26, 32, 33, 34, 65, 66, 67 , 68, 69, 70, 72, 73, 75, 76, (77), 78, 80, 82, (85), 86, 87, 88, 89, 92, 93, 94, 95, 96, 97, 101 , 113, 118, 122, 180, 184, 185. | Support Mapper: 0, 1, 2, 3, 4, 7, (9), (10), 16, 18, 19, 21, 22, 23, 24, 25, 26, 32, 33, 34, 65, 66, 67 , 68, 69, 70, 72, 73, 75, 76, (77), 78, 80, 82, (85), 86, 87, 88, 89, 92, 93, 94, 95, 96, 97, 101 , 113, 118, 122, 180, 184, 185. | ||
== | ==Installation== | ||
'''Method 1 - Basic:''' | '''Method 1 - Basic:''' | ||
hvca | hvca | ||
|- add/ | |-add/ | ||
| |- *.cfg | | |-*.cfg | ||
| |- *.nes | | |-*.nes | ||
| |- *.nsf | | |-*.nsf | ||
| |- *.fds | | |-*.fds | ||
| |- disksys.rom | | |-disksys.rom | ||
|- bin/ | |-bin/ | ||
|- cfg(samples)/ | |-cfg(samples)/ | ||
|- hvcamkfs.exe | |-hvcamkfs.exe | ||
|- merge.bat | |-merge.bat | ||
* hvcamkfs.exe does not support kana (including double-byte alphanumeric characters). | * hvcamkfs.exe does not support kana (including double-byte alphanumeric characters). | ||
* Run merge.bat. hvca.bin is output. | * Run merge.bat. hvca.bin is output. | ||
* | * If you want, find a way to add a license code to hvca.bin -> hvca.gba. | ||
'''Method 2 - [[NES2FCA GBA|NES2FCA]]:''' | |||
| | |||
<PATH>/*.cfg | hvca | ||
<PATH>/*.nes | |-add/ | ||
<PATH>/*.fds | | |-*.nsf (NES2FCA cannot merge NSF) | ||
| |-disksys.rom | |||
| | |||
|-bin/ | |||
|-cfg(samples)/ | |||
|-hvcamkfs.exe | |||
|-merge.bat | |||
nes2fca | |||
|-nes2fca.exe | |||
|-nes2fca.cfg | |||
<PATH>/*.cfg | |||
<PATH>/*.nes | |||
<PATH>/*.fds | |||
* Run merge.bat. hvca.bin is output. | * Run merge.bat. hvca.bin is output. | ||
* Put hvca.bin in the nes2fca directory. | * Put hvca.bin in the nes2fca directory. | ||
* Replace the modified nes2fca.cfg included in the download. | * Replace the modified nes2fca.cfg included in the download. | ||
* Run NES2FCA to create .gba ([http://www.ait.to/~nanashi/hvca.html#6 tutorial]). | * Run NES2FCA, at the FCA Version section choose HVCA, then select your rom files to create .gba (see also [http://www.ait.to/~nanashi/hvca.html#6 this tutorial with photos]). | ||
When you start the emulator for the first time it will show you the Internal WRAM setting screen. | When you start the emulator for the first time it will show you the Internal WRAM setting screen. | ||
| Line 72: | Line 72: | ||
==Controls== | ==Controls== | ||
+- INIT MENU | +- INIT MENU | ||
| | | | | | ||
Hold [R] | | Hold [R] | | ||
| V | | V | ||
BOOT -(LD)+> GAME MENU <--- [R]/[L] ---------------> SRAM MENU | BOOT -(LD)+> GAME MENU <--- [R]/[L] ---------------> SRAM MENU | ||
A | A | | A | A | | ||
| | +-----> Unscale/Scale | | | | | +-----> Unscale/Scale | | | ||
| [A] Hold [R] [L] [R] | | [A] Hold [R] [L] [R] | ||
| | | +[U]/[D](Unscale Y offset) | | | | | | +[U]/[D](Unscale Y offset) | | | ||
| V | | V | | V | | V | ||
| Emulation <--- [R]/[L] ---------------> | | Emulation <--- [R]/[L] ---------------> | ||
| <--- Hold [R](Reset) ------- CONFIG MENU | | <--- Hold [R](Reset) ------- CONFIG MENU | ||
+------------------- Hold [R]+[L](Reboot)--- | +------------------- Hold [R]+[L](Reboot)--- | ||
'''NSF:''' | '''NSF:''' | ||
| Line 95: | Line 95: | ||
==Screenshots== | ==Screenshots== | ||
hvca7.png | https://dlhb.gamebrew.org/gbahomebrews/hvca7.png | ||
hvca3.png | https://dlhb.gamebrew.org/gbahomebrews/hvca3.png | ||
hvca4.png | https://dlhb.gamebrew.org/gbahomebrews/hvca4.png | ||
hvca5.png | https://dlhb.gamebrew.org/gbahomebrews/hvca5.png | ||
hvca6.png | https://dlhb.gamebrew.org/gbahomebrews/hvca6.png | ||
==Known issues== | ==Known issues== | ||
| Line 111: | Line 111: | ||
==External links== | ==External links== | ||
* Official website - [https://web.archive.org/web/20100611134612/http://mc68882.s53.xrea.com/ http://mc68882.s53.xrea.com/] | * Official website - [https://web.archive.org/web/20100611134612/http://mc68882.s53.xrea.com/ http://mc68882.s53.xrea.com/] (archived) | ||
* Yahoo! Groups - https://web.archive.org/web/20050407093347/http://groups.yahoo.co.jp/group/outside-agb/ | * Yahoo! Groups - [https://web.archive.org/web/20050407093347/http://groups.yahoo.co.jp/group/outside-agb/ http://groups.yahoo.co.jp/group/outside-agb/] (archived) | ||
{{GBA emulators}} | |||
[[Category:GBA plugins for PogoShell]] | |||
Latest revision as of 08:58, 13 December 2024
| HVCA | |
|---|---|
 | |
| General | |
| Author | outside-agb |
| Type | Console |
| Version | 1.40 |
| License | Mixed |
| Last Updated | 2008/07/13 |
| Links | |
| Download | |
| Website | |
| Source | |
HVCA, or Home Video Computer Advance, is a NES emulator for the Game Boy Advance (formerly known as Unofficial Famicom Advance/UFCA).
Based on Famicom Advance, various functions such as support for new mappers have been greatly expanded. It supports sound, custom palette, real-time save, rapid-fire key, FDS emulation, NSF player, PogoShell plugin.
Support Mapper: 0, 1, 2, 3, 4, 7, (9), (10), 16, 18, 19, 21, 22, 23, 24, 25, 26, 32, 33, 34, 65, 66, 67 , 68, 69, 70, 72, 73, 75, 76, (77), 78, 80, 82, (85), 86, 87, 88, 89, 92, 93, 94, 95, 96, 97, 101 , 113, 118, 122, 180, 184, 185.
Installation
Method 1 - Basic:
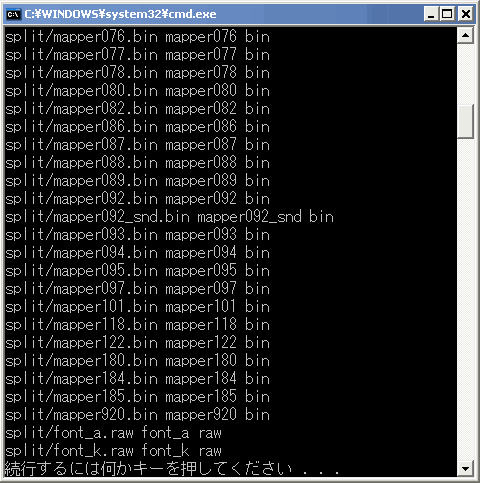
hvca
 |-add/
 |  |-*.cfg
 |  |-*.nes
 |  |-*.nsf
 |  |-*.fds
 |  |-disksys.rom
 |-bin/
 |-cfg(samples)/
 |-hvcamkfs.exe
 |-merge.bat
- hvcamkfs.exe does not support kana (including double-byte alphanumeric characters).
- Run merge.bat. hvca.bin is output.
- If you want, find a way to add a license code to hvca.bin -> hvca.gba.
Method 2 - NES2FCA:
hvca
 |-add/
 |  |-*.nsf (NES2FCA cannot merge NSF)
 |  |-disksys.rom
 |
 |-bin/
 |-cfg(samples)/
 |-hvcamkfs.exe
 |-merge.bat

nes2fca
 |-nes2fca.exe
 |-nes2fca.cfg

<PATH>/*.cfg
<PATH>/*.nes
<PATH>/*.fds
- Run merge.bat. hvca.bin is output.
- Put hvca.bin in the nes2fca directory.
- Replace the modified nes2fca.cfg included in the download.
- Run NES2FCA, at the FCA Version section choose HVCA, then select your rom files to create .gba (see also this tutorial with photos).
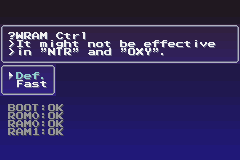
When you start the emulator for the first time it will show you the Internal WRAM setting screen.
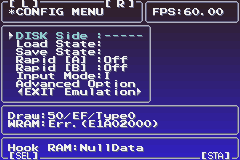
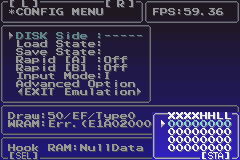
Controls
          +- INIT MENU
          |       |
      Hold [R]    |
          |       V
BOOT -(LD)+> GAME MENU <--- [R]/[L] ---------------> SRAM MENU
       A      |                                       A   |
       |      |   +-----> Unscale/Scale               |   |
       |     [A] Hold [R]                            [L] [R]
       |      |   | +[U]/[D](Unscale Y offset)        |   |
       |      V   |                                   |   V
       |     Emulation <--- [R]/[L] --------------->
       |               <--- Hold [R](Reset) -------  CONFIG MENU
       +------------------- Hold [R]+[L](Reboot)---
NSF:
L+R - Exit
Down/Up - Next/Previous NSF
Right/Left - Next/Previous track
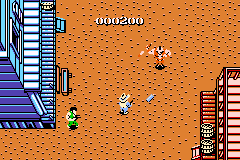
Screenshots
Known issues
Does not work as intended on VisualBoy Advance 1.8.0.
Only one save slot for real-time saves.
Saving on the Famicom Disk System is not supported (possible if real-time save is used).
External links
- Official website - http://mc68882.s53.xrea.com/ (archived)
- Yahoo! Groups - http://groups.yahoo.co.jp/group/outside-agb/ (archived)
| |||||||||||||||||||||||||||||||||||||||||||||||||||||||||||||||||||||||||||||||||||||||||||||||