More actions
No edit summary |
No edit summary |
||
| Line 5: | Line 5: | ||
|author=Luca1991 | |author=Luca1991 | ||
|lastupdated=2022/11/17 | |lastupdated=2022/11/17 | ||
|type= | |type=File Operation | ||
|version=2022.11.17 | |version=2022.11.17 | ||
|license=GPL-3.0 | |license=GPL-3.0 | ||
Revision as of 14:52, 7 Mayıs 2024
| NDSFactory | |
|---|---|
 | |
| General | |
| Author | Luca1991 |
| Type | File Operation |
| Version | 2022.11.17 |
| License | GPL-3.0 |
| Last Updated | 2022/11/17 |
| Links | |
| Download | |
| Website | |
| Source | |
| Support Author | |
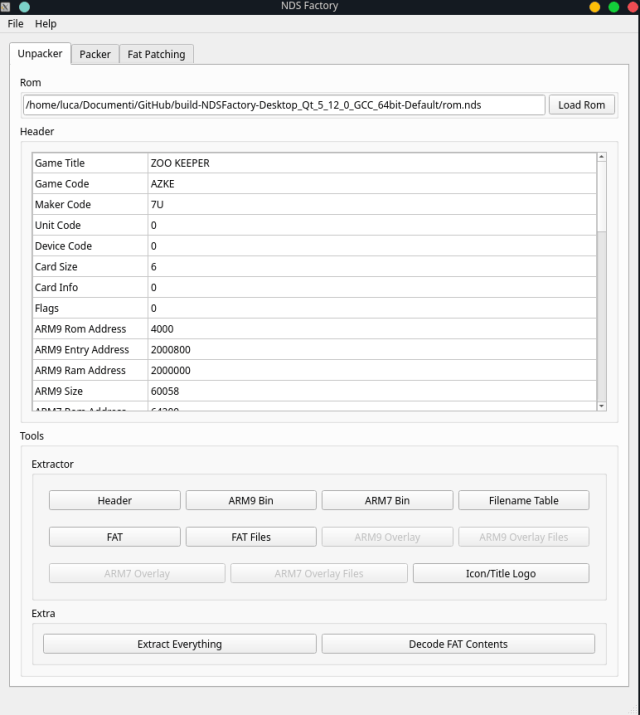
This tool, NDSFactory, makes it easy to unpack and repack Nintendo DS ROMs, but it requires some prior knowledge. Here's a breakdown of the different sections in an NDS software:
- Header
- ARM9 Binary
- ARM7 Binary
- FNT (Filename Table)
- FAT (File Allocation Table)
- ARM9/ARM7 Overlay (Optional)
- ARM9/ARM7 Overlay Files (Optional)
- Icon/Title Logo
- FAT Files (The actual files used by the software, like graphics, music, etc.)
With NDSFactory, you can extract these sections, modify them using your preferred method, and then rebuild the ROM with your edited sections. If the modified sections are larger than the original ones, you can specify their new physical address and size in the header. However, make sure they don't overlap, and remember to PATCH THE FAT.BIN (see usage).
This software is particularly useful for those interested in modding their games or creating trainers for them.
User guide
Unpacker Tab
Load your Nintendo DS software (.nds) in the unpacker tab.
Extract the ROM sections, including individual FAT files.
Note the Original Address of the FAT Files; you'll need this value later if you plan to alter addresses and sizes of the sections.
Perform modifications on these sections (inject code, apply patches, etc.).
Packer Tab
In the packer tab, recreate an .nds file using your edited sections.
If your edited sections are larger than the originals, edit their addresses and sizes in the header.
Ensure addresses don't overlap to avoid breaking the final ROM.
If repacking edited sections, and the FAT Files Address is different from the original, patch the FAT (fat.bin). The FAT is a list of absolute addresses (representing each file's start and end addresses). Use the FAT Patching Tab for this.
Fat Patching Tab
Load your fat.bin.
Fill in the original address and the new address of fat_data.bin.
This produces a patched fat.bin for use in the packing process.
Remember, patching the FAT is necessary only if the FAT Files (fat_data.bin) final address differs from the original one.
Limitation
(2022/11/17) ROMs with overlay are currently not supported.
Screenshots
Changelog
Feat/fat decoding (#14) 2022/11/17
- First step in implementing FAT file decoding : brute-force extraction without FNT lookup.
- The FAT alone contains enough information to extract every file in a folder chosen by the user. However, reference to the file name table (FNT) is needed to restore the files' names and the directory structure (and avoid dumping useless data that may be left over in the data section).
- This commit only implements the dumping of all data by incrementing through the FAT and writing every section marked by a FAT range into a separate file, giving them incremental names. The next commit will use the FNT to name them properly.
- Proper FAT decoding : FNT lookup and directory structure.
- Code comments explain the algorithm (which was understood thanks to the wonderfully simple "FNT-Tool" script at: https://github.com/RoadrunnerWMC/FNT-Tool) ; the implementation is more or less a C++ port of the Python code. Everything may still be a little dirty, but it works!
v.1.0 2019/09/13
- First Release.
- UPDATE 06 Dec 2020: rebuilt Windows version using msvc2019 (instead of mingw version of gcc). This should fix issue #1.
Credits
Developed with love by Luca D'Amico.
Special thanks to Antonio Barba & Davide Trogu.

